Thursday, August 8, 2013

The Fun World of Screen Printing

 My first experience with screen printing was in my high school graphic arts class. For one assignment we made a mixed CD, created an insert and screen printed the CD with an image of our choosing. My mix was full of Led Zeppelin, Jimi Hendrix and Pink Floyd and what that had to do with a lion crest is something that has been lost in the sands of time.


I can't believe I still have this!

 What I do remember though is how much I really liked using the screen printing process and how I was really intimidated by all of the steps that it took to prepare a screen for printing. This kept me from trying screen printing for a long time.

Flash forward a couple of years to a trip to the thrift store where I scored a compete screen printing set for a whopping $5! 


While it came with a set of directions, they were less than helpful as I kept getting distracted by the extremely creepy drawings that accompanied the instructions. So the kit sat unused for many years and made the trip to Thailand and back without ever being opened.


What is wrong with his face ?!

What finally inspired me and gave me the confidence to finally take up screen printing again was a series of tutorials posted by Quirkiecraft. The tutorials are really clear and all the photos were really helpful. So, I started my new foray into screen printing by selecting a couple of images that I wanted to use to make some hand printed fabric and used drawing fluid to paint the images on to the screen. 


One thing I did learn from using the drawing fluid was that it is really hard to paint fine lines because the fluid tends to spread and obscure the lines. I actually had to rinse out my screen and start over twice before I created a satisfactory screen.


Screen ready for screen filler


Ready for printing!

Using these screens, I was able to create some really fun fabrics. 


Monday, March 11, 2013

"Believe" Mixed Media Canvas

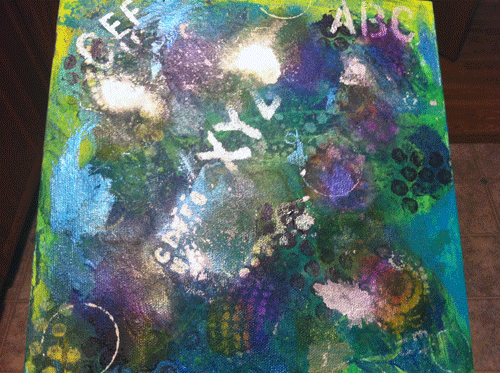
I can't seem to stop making mixed media canvases with lots of texture. I tried really hard to stay away from the modeling paste on this canvas, but apparently I just couldn't help my self.


Fun with stencils!
So this canvas started out with a mixture of acrylic paints and spray inks. I really wanted to make an art piece similar to this one, but with a little bit of a twist. So my next step was to bust into our tape stash and cover the canvas with random tape strips.
All taped up and no where to go
Next I used some white acrylic paint over the top. The idea was that the spaces would be white, leaving the painted spaces under the tape. However I didn't take two things into consideration with my brilliant plan.

1. Spray inks continue to react even after they've dried.
 I ended up with a pastel green/blue instead of the bright white that I wanted.

2. Electrical tape makes a really bad mask.
 The red tape above was some electrical tape I had handy. It didn't seal correctly, so the white paint seeped under the tape, messing up my clean lines.
A pretty pastel, but not really what I was going for.
So after I pulled the tape off the canvas, I tried to figure out how to salvage this piece of art. I decided to do what I do best- build up layers and layers of texture using modeling paste. I also used Distress re-inkers to draw on the canvas and added some bubble wrap stamping. The final touches were some painted cardboard strips and chipboard letters.
So much texture!


So I guess the moral of my story is that 1. It is really hard to resist the siren call of the texture paste and 2. If you've messed up on a piece of art, more layers of paint and texture will fix that right up.

Saturday, February 2, 2013

Art Journal- "One Word"

The prompt for this art journal entry was "One Word". After thinking of several words that moved me, I settled on this one:


I choose "Create" because I believe in the power of creativity. It doesn't matter what I do or how I do it- as long as I am creating something, I feel I've accomplished something worthwhile.

On this page I used gesso and stencils to create a resist to the watercolors and spray inks I used. The lettering and all of the doodles were done with my new favorite art tool- Faber Castel Indian ink PITT markers. I love how these pens will write on any surface and because they take a bit to dry, I can smudge and play with them.

The page also has vellum butterflies and paisleys that I embellished with a white gel pen.


This foray in to art journaling was so much fun! I can't wait till the next prompt from A Year in the Life of an Art Journal

Wednesday, January 16, 2013

Creative Resolutions

I usually don't make traditional New Year's Resolutions, in fact I usually don't make resolutions at all. But this year I've decided that I want to push my self creatively. This desire to try new things has always been a part of my personality, and I am excited about focusing that desire on one specific project this year.

Inspired by a wonderful handmade book created just for me by the amazing Emma at QuirkieCraft, I've decided to keep an art journal for 2013. Here is the journal- it is hand-stitched and is stuffed with paper of every shape and color. It is also filled with paper that Emma silk screened herself.


And because I know that I need some sort of inspiration or prompts to not only keep me going, but keep me focused, I've decided to join A Year in the Life of an Art Journal- an awesome blog that posts new prompts and techniques to try on the 15th and 30th of each month. 

The first prompt is "One Word" and we are supposed to use water color on our journal page. I can't wait to get started!